Skip to content

circuitpython

circuitpython-bambulabs Published!

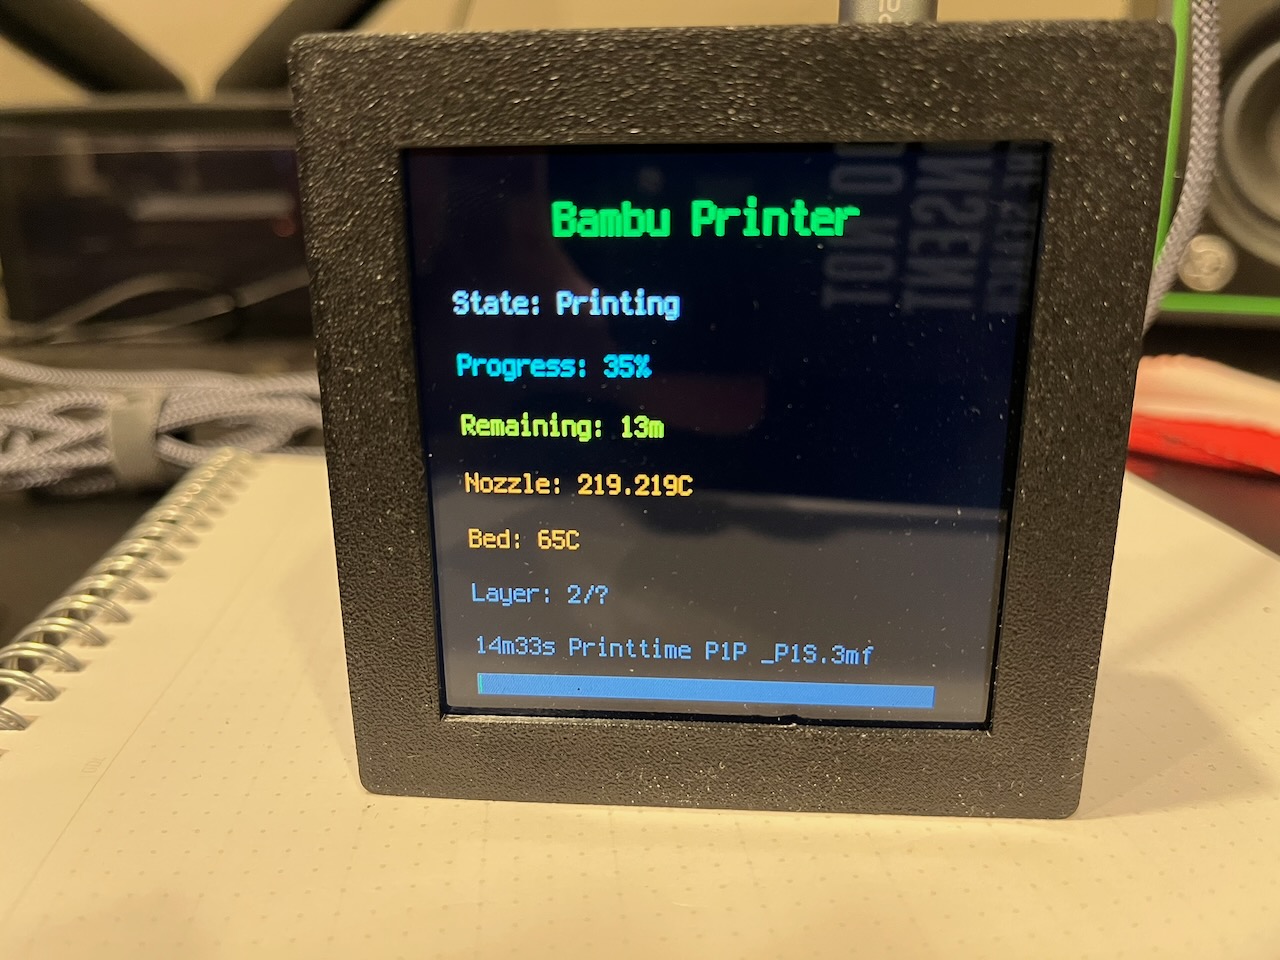
Following up on my blog post from yesterday, I spent Sunday preparing the circuitpython-bambulabs library to be published.

Unfortunately, I ran into an issue with the CI where it was failing to build. Thanks to some pointers from todbot, I was able to refactor the library and move the MQTT setup into the BambuPrinter class. This makes me happy as the user doesn't have to set up MQTT, assuming they've entered their printer settings in settings.toml, the library handles connecting for you.

I also heard from Brent Rubell at Adafruit who confirmed that the MQTT library for CircuitPython uses MQTT 3.1.1 - which is odd, because while MQTTX would connect locally using 3.1.1 (and not 5.0), CircuitPython would not connect locally. I'll investigate this more as I'm guessing some people would rather connect locally instead of through Bambu Cloud.

Other things I learned:

  • The Creating and sharing a CircuitPython library Learn Guide needs some updates. The process to create docs on ReadtheDocs has changed, libraries use ruff now for linting instead of Pylint and black, and sharing in the Library bundle needs some updates.
  • The Learn Guide doesn't cover publishing to PyPi, though the cookiecutter template does include the GitHub Actions to publish the library. It took me longer than it probably shoudl to figure out how to enter the secrets in GitHub to allow it to build and upload. This would be helpful to add to the Learn Guide.
  • The section in the Learn Guide on Sharing in a Bundle also needs an update. The section on verifying didn't work for me, though Updating the Library list did.

Lastly, a big thank you to Foamyguy who merged my pull request to add the library to the Community Libraries right away! You can find more about the library by:

  • Install via circup: circup install bambulabs to install on your microcontroller. (Just tested it and it's so cool to see that work!)
  • PyPi
  • ReadtheDocs
  • GitHub repository (And if you like it, give it a ⭐️)

Bambu Labs CircuitPython Library

I follow a number of people on GitHub and one of them is my good friend todbot. I noticed in my feed he he had starred an Arduino program called Bambu Helper that displays information and statistics from your Bambu Labs printer, such as the percentage progress of the current print, nozzle temperature, fan speed, and more.

That got me thinking - if it can be done in Arduino, it can be done in CircuitPython. It's been a couple years since I had a good CircuitPython project, so away I went. I started researching the Bambu API and more GitHub repositories than I can count, mostly Python projects that connect to a Bambu Printer using MQTT.

I then used MQTTX to connect to my printer and test the various MQTT methods. I was able to successfully connect to my P1P printer both through Bambu Cloud and locally over my network.

And then I cheated - I used Claude to bootstrap the project by pointing it at the API Docs and the BambuHelper Arduino app to create a proof of concept in CircuitPython. (I know, I know... the AI skeptic just used AI) It got pretty close - it did get the MQTT command to request a full status update wrong, but that was an easy fix.

I had the proof of concept working on my S3 Qualia board and 4" display:

Bambu Labs info displayed on a 4" screen

One thing I learned, though I'm waiting to confirm, is that CircuitPython only uses MQTT 5.0, and not 3.1.1. Connecting via Bambu Cloud will connect on both MQTT standards, but the local connection only will connect using 3.1.1, which CircuitPython doesn't appear to use that I could figure out. That means you have a few extra hoops to jump through to get a token and user ID, but it wasn't that hard and I've documented the process.

Unfortunately I appear to have fried both my S3 and S2 Reverse TFTs (thanks macOS) which I wanted to prototype with. Using a $50 worth of equipment is a bit much for a project like this. But that got me thinking - what if I could create a library so people could just get the info from the printer and then build their own UI on top of it to match their choice of microcontroller and screen?

So that's what I did next, by creating the CircuitPython_bambulabs library. This is the first time I've ever created a library and I'm following along with both the Learn Guide and the design reference. Parts of the Learn Guide are outdate (hello Ruff), but overall it hasn't been bad, though I loathe writing reStructured Text and much prefer Markdown. At least the cookiecutter setup makes it easy to edit.

Assuming you've got all the settings correct in settings.toml, the library handles the MQTT setup and querying the printer to get the JSON response and breaking down that response into individual methods.

It is also possible to send commands to your printer, for example to set the bed temperature or turn the light on or off. I purposefully did not include commands, this library is only for viewing the various status messages available from the printer.

I created a simpletest that connects to the printer and prints to serial a nicely formatted list of all the information returned from the printer and a raw dump of the JSON.

The GitHub Actions for the library are currently failing as it doesn't import the bambulabs library or the wifi module. I'm not sure why yet and have asked for some help. If you want to test it out, you can clone the repo and copy the bambulabs.py file to your /lib directory or the root directory of your CircuitPython microcontroller.

When the library is finally published and is available via circup, I'll post an update to the blog. And if you have any feedback, please let me know by dropping me an email or leaving an issue or comment in the repository.

Updating SongMatrix

One of my favorite CircuitPython projects I've done is SongMatrix. Using a microphone on a Raspberry Pi, it records the song playing in the background, uploads a sample to shazamio, uploads the song and artist to AdafruitIO via MQTT, and an S3 MatrixPortal listens for the MQTT update and displays it on an LED matrix.

I don't run it all the time, but I do like to use it when I'm listening to a new album to learn the song names. I know a lot of music and can sometimes tell you the name of the artist or the album within seconds of a song starting, but not so much the song title.

I'm using a 2.5mm pitch LED Matrix and I have not found a lot of 3D printed cases for either one or two LED matrices. That is, until a few months ago when I came across the Transit Tracker project from EastsideUrbanism.

It uses two LED matrices in a beautiful 3D printed cases that hold both of them and the S3 MatrixPortal and screws together. I printed it out months ago but couldn't get SongMatrix to work with 2 matrices.

In theory, I should be able to update the MatrixPortal library by changing: matrix = Matrix(width=64, height=32, bit_depth=3) to matrix = Matrix(width=128, height=32, bit_depth=3) But no joy. I started over with some simple test programs, and I could get a 128x32 matrix to work without a problem, but as soon as I tried in my original program it did not work.

Next I tried to replace the MatrixPortal library by using the pins directly. Success! But now it doesn't scroll across the matrix, it's just a static display. It turns out that using ScrollingLabel only scrolls when the character count is larger than the max_character when setting the text:

title_scroll = ScrollingLabel(
    terminalio.FONT,
    text=song_title_scroll,
    max_characters=20,
    color=0xff0000,
    animate_time=0.3
)

To get it scrolling, I just did a len on the string returned from AdafruitIO and added a string of spaces to get over the 20 character limit to scroll it.

But the weirdest part? The original program scrolled the text with less than 10 characters. I tried to recreate it with a basic ScrollingLabel example, and of course I couldn't get it to work. Don't believe me? You can see the original scrolling the band Metric which shouldn't be scrolling on the project's GitHub page.

Introducing SongMatrix

I listen to music. A lot of music. If I’m in my home office I’m usually listening to a record, and if not, the radio. But I’ve always been an album person, not into playlist (or mixtapes to date myself). I’ve found by listening to albums front to back, I don’t always learn the song names.

Just a few weeks ago, I came across the shazamio Python library. I have a Raspberry Pi already sitting on my desk. I also have a couple extra 64x32 RGB Matrices and I recently picked up one of the new Adafruit S3 MatrixPortals, so I have the hardware and software to start a new project.

Enter SongMatrix (GitHub).

SongMatrix records a short audio sample on the Raspberry Pi and then sends it to shazamio to be identified. It then sends a MQTT message to Adafruit IO’s MQTT broker with the song title and artist. The MQTT message is received by the S3 MatrixPortal, which then scrolls the song and artist on separate lines, like so:

A 32x64 Matrix displaying the song Breathing Underwater on the top row and the artist, Metric, on the bottom row

I whipped up a proof of concept for the Python part of recording audio and sending it to shazamioin one Friday evening. The CircuitPython part took me a couple weeks and I’ll share some of the challenges in upcoming blog posts (no promises).

A special thank you to todbot for bootstrapping some asyncio code to get me started. And to anecdata for spending a good chunk of yesterday helping me get around the last issue and getting to done. (Well, it’s never done).

MatrixPortal Album Art Display

A year and a half ago I made some progress on displaying album art on a MatrixPortal and 2 32x64 RGB matrices using CircuitPython. I was never really happy with the results and using two 32x64 matrices instead of one 64x64 matrix was difficult. I moved on and re-created the project using a PyPortal Titano. It worked well: when I chose an album I wanted to listen to SilverSaucer.com, my FastAPI web app would convert the image and send a MQTT message. The PyPortal would listen for the message, and when a new message arrived, download and display the album art along with a Winamp skin that also showed the artist and album name. I should have blogged it and taken a picture!

When Adafruit announced the new S3 MatrixPortal with so much memory - 8MB flash and 2 MB of SRAM, I decided to try again. My hope was that with that much memory, I could download and load the image into memory without having to save it.

I haven't figured out how to do it without saving the image to the MatrixPortal yet, but I was able to repurpose my original code and had it up and running in just a few minutes.

Now came the hard part: adding gamma correction to the image so it looks closer to normal on the MatrixPortal and not washed out. Adafruit has a great Learn Guide for Image Correction for RGB LED Matrices. The guide includes a CPython program that uses Python's PIL / Pillow library to manipulate the image and some logic to apply gamma correction.

I needed to re-create that program, which used command line arguments where you would pass the image name to the program, as one function within my FastAPI app. It took a few days of banging on it (and a few hours lost to a wrong indent(!)), but I got it. The get_discogs_image function downloads the given image and converts it from a 600px image to 320 x 320px (for the PyPortal) and a 64x64 image for the MatrixPortal. The process_image function then takes the 64x64 image and applies gamma correction and saves a new copy (which the MatrixPortal will download and display).

Some albums look a lot better than others. Considering it's a 64x64 image, it's practically pixel art at this point. It's too bad that it's difficult to photograph RGB matrices, but here is a picture showing Divine Fits' album, it being chosen on SilverSaucer.com, and the converted image being displayed on the MatrixPortal.

Divine Fits

Next CircuitPython Projects Up

I couldn’t resist the recent holiday sales and I bought a few parts for my next two CircuitPython projects.

First up, is re-creating my Pi-Dial project using CircuitPython on a microcontroller instead of a Raspberry Pi and Python. This project controls Zone 2 of my home theater receiver, which is my home office.

Parts used include: * ESP32-S3 microcontroller (because it has WiFI and I already had a couple on hand) * 4 key NeoKey (used to change the inputs, such as CD, Phono, or Tuner and mute) * 1 Rotary encoder (to change the volume) * 1 2” TFT screen

I already had a prototype working with the NeoKey and rotary encoder using the ESP32-S3. CircuitPython can send serial commands to my Denon receiver and I can do all of the functions I need, including changing the volume, inputs, and muting or unmuting the receiver.

For an enclosure, I’m going to use repurpose the WalkMP3rson project from Adafruit and 3D print a retro Walkman style player. I’ll need to modify it to permanently add the USB-C cable for power as it won’t be battery operated.

The biggest thing I have to learn is displayio. I don’t have any experience using displays in CircuitPython, but I’m excited because the WalkMP3rson project has a bunch of code I’ll be able to re-use.

Work in progress on the breadboard

My second project will be an IoT sensor to detect when I’m running low on water softener salt. I purchased a Time of Flight sensor that can measure the distance and connects to an ESP32-S2 Feather. It will then report back via MQTT the current measurement. I’m already running Home Assistant and I’ll set it up to report the measurement daily to my dashboard. I’ve used MQTT in one other project, but I’ve never integrated with Home Assistant. The biggest challenge so far is finding a 3D printed case that can hold both the Feather and a battery.

Those should keep me busy for a while. At least over holiday break!

Adafruit Macropad Awesome List

Inspired by the CircuitPython Awesome List, I've created an Awesome List for the Adafruit Macropad.

I finally found some time to set mine up after I received mine this past summer in the Adafruit AdaBox subscription. I've 3D printed a couple of cases for it already and also programmed mine to work with the Onshape CAD software.

It's pretty cool and I was curious to see what others had programmed for macros for their applications and I figured why not create a list for everyone!

If you have any suggestions for what to add, please let me know or feel free to fork and send a pull request. Contributing guidelines are in the list and if you have any questions, you can find me on Twitter or on the Adafruit Discord (link in the list).